


Technical Info - Reading Matter...
On this page you can read about...
- Audio line-up levels and different meter scales
-
 Capturing HDV over 1394 with the RTX2 and Premiere
Pro CS4
Capturing HDV over 1394 with the RTX2 and Premiere
Pro CS4 - VT Ident Clocks, and other TV history...
- Lighting tips for ChromaKey shoots
Other useful information can be found on these pages...
-
 Using 2/3" B4 lenses on the Blackmagic
Pocket Cinema Camera (BMPCC)
Using 2/3" B4 lenses on the Blackmagic
Pocket Cinema Camera (BMPCC) - The art of better sound - when to say 'No'
- Webstreaming and Live Video Production (inc vMix)
- Martin's problem-solving forum posts archive
- Looking back at Caption Generation
-
 IOV VideoSkills slides for the Better Encoding training
events
IOV VideoSkills slides for the Better Encoding training
events - Software downloads (free plug-ins for Speed Razor, etc)
- Links to other useful websites
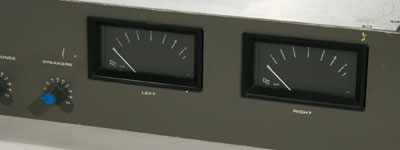
Audio line-up levels and different meter scales
 You will come across many phrases along the lines of "Line up tone at zero
level" or "Set the 1KHz tone to zero dB", but what exactly do they mean?
Well, without some further quantifying, neither of those phrases define an absolute level,
and are likely to mean different things to different people in different contexts. So how
do you find your way through this minefield of audio levels?
You will come across many phrases along the lines of "Line up tone at zero
level" or "Set the 1KHz tone to zero dB", but what exactly do they mean?
Well, without some further quantifying, neither of those phrases define an absolute level,
and are likely to mean different things to different people in different contexts. So how
do you find your way through this minefield of audio levels?
Firstly, you should be careful about how the term dB is used, because much of the confusion comes from the casual misuse of dB to describe reference levels. Zero dB is NOT a reference level! Decibels (dBs) are simply a logarithmic measure of relative power, where +10dB equates to a tenfold increase in power, +3dB equals double power, and zero dB means no change in power, or equal in power. So you can see that the term "zero dB" can only have an absolute (rather than relative) value if we know to what the comparison is being made.
In the early days of audio communications, a standard level of 1mW into a 600 ohm line was adopted. The compromise was between higher levels requiring higher power consumption, and lower levels which were more prone to induced and thermal noise. This level was referred to as "zero dBm" (0dB = 1mW/600ohm), so signals could be measured relative to this power level and the results expressed in dBm. In voltage terms, 0dBm = 0.775Vrms (Volts - Root Mean Squared), and this is still a common analogue measurement reference today. Because many audio circuits don't always drive 600 ohm lines (e.g. higher impedances require less power at the same voltage), the more common reference standard is actually dBv7, where the "v7" means 0.775Vrms into any impedance, also known as dBv or dBu. There's also a dBV reference (0dBV - 1Vrms), so the introduction of dBu made it easier to seperate between big 'V' and small 'v' reference levels. However, you will very rarely see "dBv7" in writing, as dBu is more commonly used, and it's not that unusual to see dBm (mis-)used to mean dBv7.
So how does this relate to audio level meters? Well, yet more standards, I'm afraid. One of the most common electro-mechanical meters is the Bell Lab's VU, which measures Volume Units. Here, the zero level (0VU) is set at 1.23Vrms, which equates to +4dBu, and the difference between volume unit values is equivalent to dBs (e.g. 0VU is 4dB higher than -4VU). So from this you can see that 0dBu is equal to -4VU, which you may also see written as -4dBVU or -4dBvu).
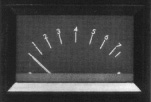 In
the UK one of the most common meter types in professional use is the BBC-style PPM. This
has no dB values indicated, and instead has equally spaced markers labelled from one to
seven, with number four at dead centre. Four on a PPM is equivalent to
the reference level 0dBm (or 0dBu), and
the rest of the scale from 1 to 7 is in 4dB increments. So, for example, PPM 6 = +8dBu, and PPM 1 =
-12dBu. Programme material is usually limited to peak at PPM 6 (+8dBu).
In
the UK one of the most common meter types in professional use is the BBC-style PPM. This
has no dB values indicated, and instead has equally spaced markers labelled from one to
seven, with number four at dead centre. Four on a PPM is equivalent to
the reference level 0dBm (or 0dBu), and
the rest of the scale from 1 to 7 is in 4dB increments. So, for example, PPM 6 = +8dBu, and PPM 1 =
-12dBu. Programme material is usually limited to peak at PPM 6 (+8dBu).
When it comes to recording devices, which used to be exclusively tape-based, reference levels related to magnetic flux levels (measured in nWb/m - nano-Webers/metre - or pWb/mm), and to how much higher you could go without distortion. There were slightly different standards from America and Europe, including NAB, IEC & CCIR. Anyone remember the excellent Hugh Ford, and his Studio Sound reviews of tape machines, including what level (in dBm) you could expect to get out when playing back a tape with the a flux level of 320pWb/mm? Depending on the type of tape, and recording speed, you could typically push the levels from 6-12dB above the reference flux before distortion started to rise more rapidly.
Digital systems behave quite differently, however, and here the distortion decreases right up to the point of saturation, after which hard (and nasty sounding) peak clipping occurs. Unlike brands of tape, all digital systems behave in exactly the same way in this respect, and so it is common for meters on digital systems to use the clipping point itself as a reference, which is known as dBfs (meaning dBs referred to Full Scale). Clearly a reference level which represents the onset of digital clipping can't be equivalent to analogue line or tape-based flux levels which are all set below the onset of distortion, so what is the conversion?
The EBU in Europe and NAB in America came up with slightly different recommendations (as ever), such that the EBU recommends 0dBu = -18dBfs (= PPM 4), and the NAB has 0VU = -20dBfs (or 0dBu = -24dBfs). Peak levels are therefore expected to be about 8-9dB higher at around -10dBfs. The extra 10dB headroom is for fast transients that meters, operators and even compressor/limiters don't always catch. Armed with this information, you might be able to make more sense of the audio line-up jungle, and at least ask the right questions when someone says "zero dB", like, "Referenced to what?".
Recording HDV as Matrox AVIs in Premiere Pro CS4 (with the RT.X2)
With some combinations of HDV cameras/decks and Vista 64 & Windows 7, Premiere fails to recognise the camera as a suitable HDV source when in "Matrox mode", even though HDV can be captured using Adobe's native HDV capture mode. If you're experiencing this problem, here's a possible solution from Linda Rossiter (www.rossiterandco.com)
| Step 1 | Step 2 |
|
Settings for HDV
Cameras (in the UK): In the In/Out Rec Menu VCR HDV/DV: HDV Component: 1080i/576i i-Link convert: Off Down convert: Squeeze |
a): Turn on camera and ensure settings are correct b): Start playing a HDV tape c): Plug in firewire cable and wait for Windows to detect the camera, which should appear in Device Manager as a Microsoft AV/C Tape Subunit Device Do not start Premiere Pro until camera is already running. |
| Step 3 | Step 4 |
|
Run Premiere Pro and create a
New Project. Capture: Matrox AVI Settings: DV-1394. Input source should show Microsoft AV/C Tape Subunit Device Create a New Sequence: Matrox HD > 1440x1080 > 1440x1080i@25fps |
In Premiere, press F5 for Capture Check Capture settings: Matrox AVI Device control: Matrox DV/HDV Device control Capture location: as required (usually same as project folder) Scene Detect: can be turned on when required |
 VT Ident Clocks, and other TV history
This turned out to be much longer than envisaged, so there's one page
for
VT Clocks
and another for Caption Generators
Editing Multi-Camera footage with Digisuite/Speed Razor
Most low to mid range NLE systems are not geared to cutting multi-camera footage, Speed Razor included, but its freeform-style timeline lends itself to a useful technique in conjunction with a real-time board like the Matrox Digisuite.Let's say you have an event which has been covered by three cameras, one static with the master sound mix, and two mobile units which have additional sync sound and effectively a guide track of the main mix. Of course you can cut this with any NLE software and any video board, but the advantage of the technique described here is that you don't have to cut any of the video tracks, which makes it easier to keep sync between the various camera tracks. Here's what you do.
Firstly, lay down the main video track with the master audio track, and then below it add the two mobile cameras' video tracks with their sync audio/ guide tracks. Turn on "show audio waveforms" and zoom right in on the timeline whilst you slide the various tracks to achieve sync. Once you have the audio tracks in sync, turn off waveforms if not required, and do a rough audio mix (or mute the guide tracks) to leave a "working" audio track mix. Arrange the order of the video clips so you have the one you're going to use most often on the highest numbered video track (so you'll see it as the "default" video track). In this example you now have video on tracks 1, 2 & 3.
Now the editing. Play the video until you want to cut away from the "default" camera and hit Tab to add a marker at that point. Then add the MatroxDVE effect onto track 5 (not 4, or else it'll extend and auto-attach itself to the video on track 3). It's a good idea also to turn off "Change Effects Parameters when drop into Composition" in Misc Preferences, as you don't want to change the DVE effect parameters most of the time. Instead, just drag it so that the start lines up with your marker, extend the other end as far down the timeline as possible, and source it to whichever video track you want to cut to (let's say track 1). Leave the effect highlighted, move your "current position" marker back to before the edit and hit play. At the marked point the DVE on track 5 will take priority over the video on track 3 and do a full-size DVE of the track 1 video over the top of it - effectively a cut, but without cutting any actual video tracks. As the cut-away plays, hit Stop (spacebar) where you want the shot to end, and press 'O' to shorten the DVE effect (which you left highlighted) and set its Outpoint to the current position. This only works if the effect is already longer, rather then shorter, than the desired length.
Of course sometimes the decision on where to make the outpoint is based on what's happening on the original video track, rather than on the cutaway. In that case temporarily change the function of the DVE to create a small Picture In Picture so you can see the background video whilst the edit plays. Set the DVE back to "full screen" after you're happy with the edit points. Or just place two markers (for In & Out) when you played the original video track and stretch the DVE to fit between them.
This technique can be applied to any number of synchronous video tracks, with the advantage that all the sync audio tracks are always available without having to "separate audio and video", and without the risk of chopped-up video fragments getting nudged out of sync by accidental moving when attempting to trim. Also, you can "invisibly" remove & repair an edit just by removing the associated Matrox DVE effect.
Nothing's perfect, of course, and there are limitations to this technique, particularly if you need transitions between shots. In the above example, there's no problem with transitions between V3 & V1, or V3 & V2; just place the MatroxTrans on track 6 and source either the In or Out (as appropriate) to the DVE effect on track 5. It's when you want a transition between V1 & V2 that the problem arises, because you can only use one DVE over the stack of video tracks without having to render, and you would need two in order to get both V1 and V2 over the top of V3, without physically cutting and moving them, or cutting a hole in V3, which is what we're trying to avoid. Still, it works most of the time and for cuts-only editing I've yet to find a quicker or more versatile method with this level of software.
Obscure (and forgotten?) bugs in Speed Razor
Here's one for starters that's been around since version 3 and is still with us in version 4.7. It's not fatal, but it can cause a fair amount of panic and confusion amongst the unwary. I call it the Directory Level bug, and it works like this. In the Preferences->Directories menu, you have a dialogue box in which you specify paths for various data like Video Finals, Audio Finals, Projects, etc. To these paths SR adds the name of your project when you start a New Project, in order to create a new set of directories to store your data. Often, the path may be to the root of a disk (like V:\ for video files), but in the case of project (.rzx) files it defaults to "C:\razor47\Projects\". When you start a new project (e.g. Showreel) you get a new directory called "C:\razor47\Projects\Showreel" into which your project files will be saved.
All well and good until for some reason you start up your system without one of the specified disk drives. This can easily happen if you have external SCSI drives and you forget to power them up before starting the PC. You run Speed Razor and get a message about it not finding or creating a directory on one of your drives, and you have to change the appropriate Video/Audio Final path before you can continue. Probably you quit and reboot with the drives powered up, run Razor again, and re-add the drive back into the system. What you probably won't have noticed is that every time SR starts and can't find a disk, it bumps all the Directory Paths up a level - if they aren't already set to a root level, that is. So, in the example above, "C:\razor47\Projects\" has been shortened to "C:\razor47" , and a new directory has been created at "C:\razor47\Showreel". You won't notice if you load your project via the "recently saved" list at the bottom of the File menu, but next time you select "Save As" you'll find an empty directory and wonder where all your previous project files have gone.
Windows doesn't help much here, because the top line of the File Dialogue box only shows the current directory (which is still Showreel) but not the whole path, so you don't see that the path has changed and that you've gained an extra directory at a different level of the hierarchy. Also, the auto-numbering gets screwed up too, and the suggested version number resets to zero because it doesn't find any previous versions there. If this scenario happens several times, you end up with a succession of directories at all the available levels, ending with C:\Showreel, which potentially might contain both project files (which started in C:\razor47\Projects\Showreel) and audio (which started in C:\razor47\audio\Showreel). If you check your system and find you have several "Default" directories at different levels on your C drive, then that's probably how they got there!
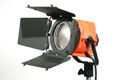
Lighting tips for ChromaKey shoots
Now I'm no Lighting Director or DOP, but I've been on enough ChromaKey shoots to know the important role that lighting plays in getting good results at the post production stage. And the first thing to realise is that you really need quite a few lights and plenty of space. The two main enemies of good ChromaKey are uneven background lighting, and reflected spill onto the actors or foreground objects.
Start by lighting the background, as evenly as possible, with no shadows. These lights should be behind, or at worst level with, the foreground action. Then light the foreground with its own set of lights. Space plays a big part here, because if you can get lots of separation between the actors and the coloured background, then there's less chance that the foreground shadows will hit the backing. Also, distance will minimise the "colour fringe" from light reflected off the backing.
Finally, to neutralise any remaining colour-cast from light reflected off the backing, add some soft back-light from both sides, using a gel of a complementary colour to the backing. So for a blue backing, use CTO (orange) backlight, in the same way that you would match the different colours of daylight and tungsten lights. Adjust the level (or distance) of the backlights until you have neutralised the reflected spill.
And that's it! If you come into post production with blue-screen footage where the background is a nice even blue, and there's no "blue fringe" on the clothes, hair and skin, then even the most basic ChromaKey hardware or software will stand a chance of giving you good results. If not, and it's another lengthy (expensive) rescue job....

" I've been a regular contributor to user groups and technical forums for the last 20 years or so, and have written hundreds of posts offering advice and information on a whole range of computer, audio & video production topics."Read a few of them here... |

 Copyright ©
2022 Zen Computer Services.
Copyright ©
2022 Zen Computer Services.